2022-04-09
pod 是 k8s 中的最小单位。当调用 k [create|apply|replace] -f xxx.yaml 的时候,会先创建一个 infra 容器。这个容器将挂载所有 pod 相关的资源(namespace / cgroup),然后永久挂起。其他后续启动的 pod 中的容器再按需加入到 infra 容器相关的资源上。
- 容器间可通过 localhost 通信,拥有共同的网关
- 一个 pod 只有一个 IP 地址
- pod 生命周期就是 infra 容器的生命周期,和其他容器无关
这就是 pod 的基本结构,下面是几个基于该结构所做的小实验。
两个容器如何共享一个 volume?
本地创建一个 share-volume.yaml 文件,并且写入下面的内容 :
apiVersion: v1
kind: Pod
metadata:
  name: share-volume
spec:
  restartPolicy: Never
  volumes:
    - name: shared-data
      hostPath:
        path: /data
        type: Directory
  containers:
    - name: nginx-container
      image: nginx
      volumeMounts:
        - name: shared-data
          mountPath: /usr/share/nginx/html
    - name: debian-container
      image: debian
      volumeMounts:
        - name: shared-data
          mountPath: /usr/share/nginx/html
      command: ["/bin/sh"]
      args: ["-c", "echo 'Hello from the debian container' > /usr/share/nginx/html/index.html"]
pod 内容很简单,就是启动两个容器,他们共享了 shared-data 这个 volume。并且当 debian 启动的时候会将一句话写到对应的文件中,然后在 nginx 中就能看到这句话。
发布该 pod: k apply -f share-volume.yaml

等一会创建成功以后,进入 pod 看看 volume 是否分享成功: k exec -it share-volume /bin/sh
查看对应文件内容: cat /usr/share/nginx/html/index.html
输出: Hello from the debian container
这里有个小问题:
k exec -it share-volume /bin/sh 仅仅指定了 pod 名称,那我进入的到底是 nginx 还是 debian 的 container 呢?
其实 k8s 也不清楚,所以他会打一条告警,然后默认选择了 nginx:
kubectl exec [POD] [COMMAND] is DEPRECATED and will be removed in a future version. Use kubectl exec [POD] -- [COMMAND] instead.
Defaulted container "nginx-container" out of: nginx-container, debian-container
为了规避掉这个告警,可以使用: k exec -it share-volume -c nginx-container -- /bin/sh 来指定具体要进入的 container。
如何规划 run once job?
如果你曾经用 docker compose 配置过 docker-elk 这个项目,你就会发现在项目启动过程中,有一个 setup 的 container,启动以后就直接退出了。
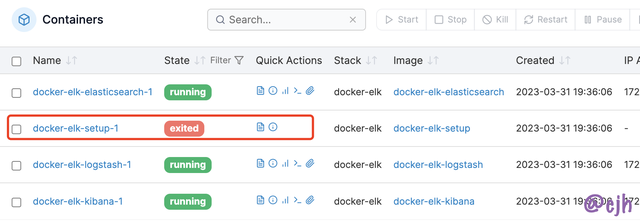
这个 container 的目的就是为 elk 配置环境,且只需执行一次。
实际开发中这种情况相当常见, K8S 内置了一个叫做 spec.initContainers 的声明,可以按照声明顺序执行相应的 container,只有当所有的 initContainers 都退出了以后,真正的 container 才会启动。
如何让一个 pod 里的容器间共享进程空间?
已知 container 之间的进程空间是通过 namespace 进行隔离的,那只需要将所有容器都加入到该 PID namespace 就可以了。对应在 k8s 中其实就是一行命令:
# create a k8s deployment which deploy both nginx and busybox, and share the same volume

apiVersion: v1
kind: Pod
metadata:
  name: nginx-busybox
  labels:
    app: nginx-busybox
spec:
  shareProcessNamespace: true # let k8s pod share the process namespace between containers
  containers:
    - name: nginx
      image: nginx
    - name: shell
      image: busybox
      stdin: true
      tty: true
按照上面相同的方法进入 shell 这个容器,然后使用 top 查看进程空间,发现已经可以观察到 nginx 的进程了:

当然还有第二种进入容器的方法: k attach -it nginx-busybox -c shell 。这句话的意思是进入 shell 容器并通过 bash 终端进行交互,等同于 docker exec -it
如果不是在 pod 中的 container 之间共享网络,而是在物理机上呢?
hostNetwork: true</code> 共享主机网络</li><li data-block-key="8gt75"><code>hostIPC: true`hostPID: true共享进程空间
如何查看 Pod 运行状态?
排错(debug)应该是用的最多的功能。
k describe pod share-volumek logs share-volume -c <container-name>k exec -it <pod-name> -c <container-name> -- <cmd to execute>- ChatGPT / Google
如何在启动时挂载配置?(Projected Volume)
挂载密码(secret)
老板并不想让开发知道 live 的 MySQL 密码,如何在容器启动时才动态插入 MySQL 密码?
K8S 提供了 Projected Volume 机制,以其中的 Secret Projected Volume 为例,下面是一个注入 MySQL 密码的例子:
apiVersion: v1
kind: Pod
metadata:
  name: secret-volume
spec:
  containers:
    - name: test-secret-volume
      image: busybox
      args: ["sleep", "3600"]
      volumeMounts:
        - name: mysql-creds
          mountPath: /etc/mysql-creds
          readOnly: true
  volumes:
    - name: mysql-creds
      projected:
        sources:
          - secret:
              name: myuser
          - secret:
              name: mypwd
然后在 K8S 中创建密码文件:
echo "admin" > username.txt && k create secret generic myuser --from-file=username.txtecho "123456" > password.txt && k create secret generic mypwd --from-file=password.txt
最后编排 pod,并进入指定目录查看,可见密码信息已经成功输入:

想拿出来看看也很容易:
- 查看 K8S 中的 secret 列表:
k get secrets - 获取相应的 secret 数据:
k get secret mypwd -o yaml
apiVersion: v1
data:
  password.txt: MTIzNDU2Cg==
kind: Secret
metadata:
  creationTimestamp: "2023-04-14T02:23:02Z"
  name: mypwd
  namespace: default
  resourceVersion: "274284"
  uid: 940c82e5-f2dc-4af0-ac55-079562790be8
type: Opaque
可见这里的密码被加密为 base64 了,只需解码就能看见明文: echo "MTIzNDU2Cg==" | base64 -d
输出: 123456
K8S 中还有 secret 相关的加密插件,暂时先放着。
另一个小 tips 就是如果不知道 secret 的 yaml 文件应该怎么写,可以先输出一个现成的密码的 yaml 文件,然后照猫画虎即可。
挂载配置(configmap)
在 web 程序启动前写入配置文件是一个相当常用的功能,例如插入 .properties 文件。
下面先在 K8S 中创建一个 .properties 配置文件,然后再在运行时插入,配置文件内容为:
color.good=purple
color.bad=red
allow.textmode=true
how.nice.to.look=fairly.nice
保存到 K8S:
k create configmap ui-config --from-file=.properties
查看配置结果:
k get configmapsk get configmap ui-config -o yaml
apiVersion: v1
data:
  .properties: |
    color.good=purple
    color.bad=red
    allow.textmode=true
    how.nice.to.look=fairly.nice
kind: ConfigMap
metadata:
  creationTimestamp: "2023-04-14T02:56:01Z"
  name: ui-config
  namespace: default
  resourceVersion: "275872"
  uid: fbf476d0-3407-4914-9ff7-89b7701935b4
挂载当前 Pod 配置(Downward API)
启动时的容器可能还想检查下当前 pod 的运行环境是否配置正确,例如在 web 项目启动时看看 Traefik 的路由规则(对应 pod 的 label)是否已经配置,用下面的声明可以在启动时打印 pod 当前所有的 label:
apiVersion: v1
kind: Pod
metadata:
  name: my-downward-api-pod
  labels:
    zone: asia-taipei
    cluster: my-k8s
    rack: rack-1
    traefik.enable: "true"

spec:
  containers:
    - name: my-downward-api-container
      image: busybox
      command: [ "/bin/sh", "-c" ]
      args:
        - while true; do
            if [[ -e /etc/podinfo/labels ]]; then
              echo -en '\n\n'; cat /etc/podinfo/labels; fi;
            sleep 5;
          done;
      volumeMounts:
        - name: podinfo
          mountPath: /etc/podinfo

  volumes:
    - name: podinfo
      downwardAPI:
        items:
          - path: "labels"
            fieldRef:
              fieldPath: metadata.labels
          - path: "cpu_limit"
            resourceFieldRef:
              containerName: my-downward-api-container
              resource: limits.cpu
              divisor: 1m
          - path: "memory_limit"
            resourceFieldRef:
              containerName: my-downward-api-container
              resource: limits.memory
              divisor: 1Mi
发布并等待 pod 启动后查看该 pod 的日志,此时应该可以看到 pod 的 label 信息已经被每隔 5s 打印出来了:

挂载 K8S API Token(Service Account)
如果我有一个 Pod 是专门用来操作 K8S 的,类似 portainer-agent 会调用 Docker API 来同步 / 发布 container。那这在 K8S 里应该怎么实现呢?
Service Account 是 K8S 中管理 API 权限的账户服务模块,管理例如 Pod 的 CRUD 操作。每个 Pod 其实都已经有内置的 Service Account 了,举个例子:
k describe pod nginx-busybox
这里列出了输出的关键部分:
Containers:
  nginx:
    Container ID:   docker://a1a2ce62e32e834bf9884def2c3ceb4e008eb27877553bf8a4a2e93c4c32e68b
    Image:          nginx
    Mounts:
      /var/run/secrets/kubernetes.io/serviceaccount from kube-api-access-wnxc2 (ro)
  shell:
    Container ID:   docker://31356d5d0837d9cd1428f8dbefc273227b14bdee61c73a411e7c51de9cfd8a8d
    Image:          busybox
    Mounts:
      /var/run/secrets/kubernetes.io/serviceaccount from kube-api-access-wnxc2 (ro)
Volumes:
  kube-api-access-wnxc2:
    Type:                    Projected (a volume that contains injected data from multiple sources)
    TokenExpirationSeconds:  3607
    ConfigMapName:           kube-root-ca.crt
    ConfigMapOptional:       <nil>
    DownwardAPI:             true
nginx-busybox 里有 nginx / busybox 两个 container,上面输出了这两个 container 相对应的 volume 信息。可以看见两个都包含相同的: /var/run/secrets/kubernetes.io/serviceaccount ,且都 mount 到了 kube-api-access-wnxc2 。这里可以理解为在启动时 K8S 会自动在 spec.volumes 声明,并在每个 container 的 volumeMounts 中加上该 volume,整个过程对调用人员是完全透明的。
从 volume 的信息知道这是一个 configmap 配置,那就直接输出这个配置看看: k get configmap kube-root-ca.crt -o yaml
apiVersion: v1
data:
  ca.crt: |
    -----BEGIN CERTIFICATE-----
    MIIDBjCCAe ....省略.... DdmHeV7C5s9OIQ==
    -----END CERTIFICATE-----
kind: ConfigMap
metadata:
  annotations:
    kubernetes.io/description: Contains a CA bundle that can be used to verify the
      kube-apiserver when using internal endpoints such as the internal service IP
      or kubernetes.default.svc. No other usage is guaranteed across distributions
      of Kubernetes clusters.
  creationTimestamp: "2023-04-10T03:32:27Z"
  name: kube-root-ca.crt
  namespace: default
  resourceVersion: "428"
  uid: 3bc02d1c-29fc-4dac-a400-acc23ca604f5
再进容器相应目录看看具体加载结果是什么:
cd /var/run/secrets/kubernetes.io/serviceaccount && ls
ca.crt namespace token
利用这些信息就可以访问 K8S API。
配置太多漏掉了咋办?
K8S 提供了 preset 机制,可以为指定 name 的 pod 添加多种属性。这样当 pod 启动时 K8S 就会默认将 preset 和对应的 pod 声明内容进行合并。下面是一个 preset 文件的例子:
apiVersion: settings.k8s.io/v1alpha1
kind: PodPreset
metadata:
  name: allow-database
spec:
  selector:
    matchLabels:
      role: frontend
  env:
    - name: DB_PORT
      value: "6379"
  volumeMounts:
    - mountPath: /cache
      name: cache-volume
  volumes:
    - name: cache-volume
      emptyDir: {}
文件中指定了名称为 frontend 的 pod 启动时会自动将该 preset 文件中的内容 merge 到 pod声明中。如果有多个 preset 指定了相同的 pod,K8S 会自动将其合并,如果 preset 之间有冲突,则会直接报错。